5 Gorgeous (And Functional) Gym Hairstyles
Are you sick of wearing basic ponytails? Want some new fresh hairstyles that are gorgeous and functional? Not only will these hairstyles keep hair out of your face during a killer cardio session or workout of the day (WOD), these looks aren't sloppy, so you'll be able to go straight from the gym to work... Talk about functionality!
Dutch Braid
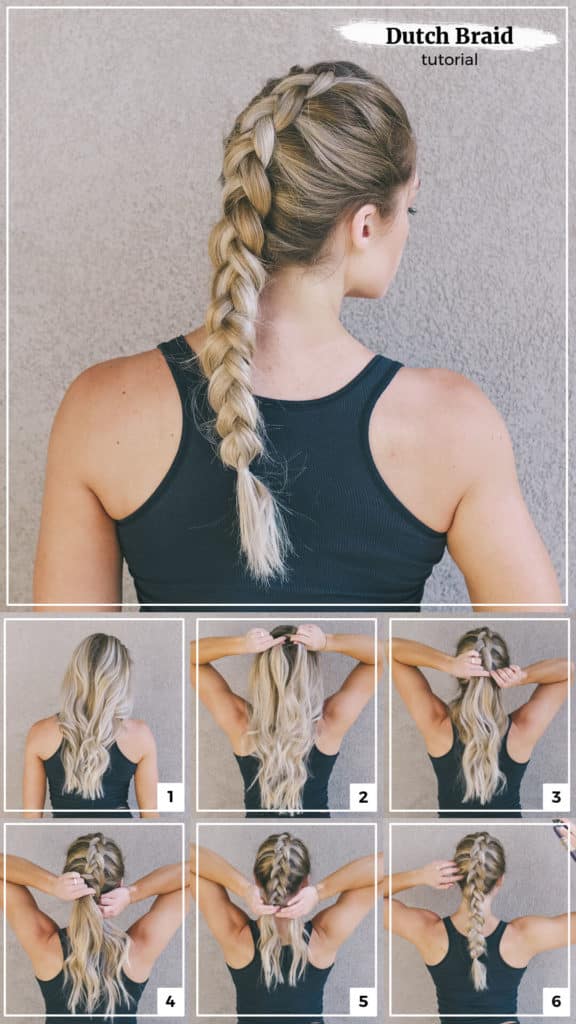
Dutch Braid Step-By-Step Tutorial Image
This braid is super functional! If I am about to hit a Soul Cycle class and know I don't want to worry about my hair falling out or down, I will do a tight dutch braid. It will stay in — guaranteed! However, when I have a weightlifting session planned at the gym and won't have to worry too much about my head moving a lot, I will create a looser, more stylish dutch braid to keep my hair out of my face and eyes.
What You'll Need:
1 Regular Hair Elastic
Brush
Bobby Pins
Comb or something to part your hair
Hairspray
Instructions:
Take hair at the crown in the middle of the head and divide into 3 sections (middle, right, left).
Take the left section and cross it under the middle section.
Now, take the right section and cross it under the middle section.
Start adding more hair to the braid. Take a small section of un-sectioned/separated hair that is already down on the left side and combine it with the current left section.
Be sure to cross under the middle section.
Next, do the same thing on the right side: take hair and combine with the current right section.
Cross that combined section under the middle section.
Repeat all the way down the hair.
When you hit the nape of your neck, if your arms are starting to hurt, you can take all the hair to the side and finish off with a three-strand braid!
If you want your braid more chunky – you can pull lightly on the hair to fan it out (which will give the appearance of a more voluminous braid!)
Once you have created your desired look, spray with hairspray to secure!
* Important Tip: Dutch braids can feel intimidating at first, but the more you practice, you will get it in no time!
Top Knot
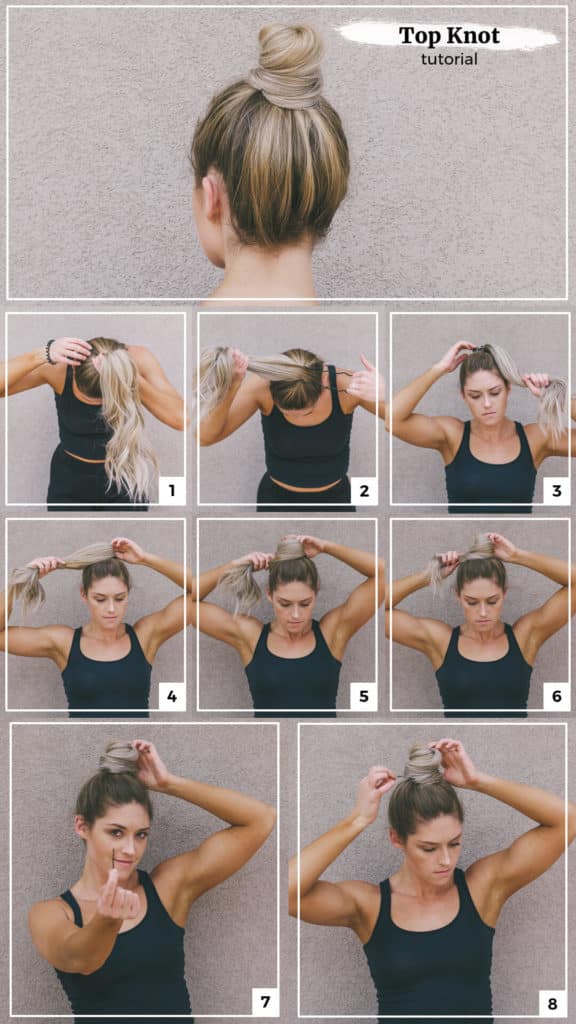
Top Knot Step-By-Step Tutorial Image
This is a slight twist on the typical messy bun. I find that if I keep my top knot cleaner, it will be more secure for my workout so I don't have to worry about it falling down while doing jumping jacks or something that involves my head bouncing around a lot! I also prefer to use the keychain hair elastic because I find that it holds the hair tighter and doesn't leave a crease in my hair. Win-Win!
What You'll Need:
1 Keychain Hair Elastic
Brush
Bobby Pins
Texturizing Spray
Hairspray
Instructions:
Start by spritzing some of your favorite texturizing sprays to make hair feel gritty or "second-day hair" (if needed).
Brush hair to evenly distribute the texture spray.
Pull hair into a high ponytail and tie it with a keychain hair elastic twice.
Wrap your hair in a clockwise direction around the base of the ponytail.
Once you get to the end of your hair, secure it with a bobby pin (or two).
If there are any loose ends in the bun, secure them with a bobby pin.
If you want to make your bun wider or taller, pull (gently) on the ends to make it bigger.
Once you have created your desired look, spray with hairspray to secure!
Double Dutch Braids

Double Dutch Braids Step-By-Step Tutorial
I love this hairstyle for the gym and daily use! It is guaranteed to make your sweaty face 100x cuter! Not only does it keep my hair out of my face and eyes, but, if you keep them in long enough, you will get some gorgeous waves for your second or third-day old hair.
What You'll Need:
2 Clear Elastic Mini Hair Bands
1 Regular Hair Elastic
Brush
Bobby Pins
Comb or something to part your hair
Hairspray
Instructions:
Part your hair in two sections (could be down the middle or offset)
Pull back one half of your hair tight so that it does not interfere with the other side of your hair.
Take hair at the crown in the middle of the head and divide into 3 sections (middle, right, left).
Take the left section and cross it under the middle section.
Now, take the right section and cross it under the middle section.
Start adding more hair to the braid. Take a small section of un-sectioned/separated hair that is already down on the left side and combine it with the current left section.
Be sure to cross under the middle section.
Next, do the same thing on the right side: take hair and combine with the current right section.
Cross that combined section under the middle section.
Repeat all the way down the hair.
When you hit the nape of your neck, if your arms are starting to hurt, you can take all the hair to the side and finish off with a three-strand braid!
Repeat on the other side of your head for your second braid.
If you want your braids more "chunky" pull lightly on the hair to fan it out (which will give it the appearance of a more voluminous braid!)
Once you have created your desired look, spray with hairspray to secure!
Side Twists

Side Twists Step-By-Step Tutorial Image
This is my "I-want-to-look-like-I-actually-put-effort-into-my-hair-but-don't-want-to-actually-take-time-to-braid-it" hairstyle! I would recommend this for light/moderate workouts as it is a looser hairstyle. Whether you have long hair (like me) or shorter hair, this is a great hairstyle to pull your hair away from your face and eyes.
What You'll Need:
2 Clear Elastic Mini Hair Bands
1 Regular Hair Elastic
Brush
Bobby Pins
Comb or something to part your hair
Hairspray
Instructions:
Part your hair in two sections (could be down the middle or offset)
Pull back one half of your hair tight so that it does not interfere with the other side of your hair.
Split on the section of hair into two equal sections.
Take the right piece of hair and twist under the left strand
Grab a section of hair from the left side.
Grab a section of hair from the right side.
Twist those two sections of each section.
Repeat all the way down until you reach the nape of your neck.
(Reposition over the shoulder if you need to) and continue twisting the hair.
Twist the hair tightly.
Secure with a hair elastic 4-5 times (you want it to be tight!).
Once you let go of the hair, you will see the twist naturally untwist slightly to create a looser look.
Once you have created your desired look, spray with hairspray to secure!
Reverse Braid Bun

Reverse Braid Bun Step-By-Step Tutorial Image
Although it might take a couple tries, (I will admit that I practiced this hairstyle upwards of 10x before I felt like I got the hang of it… but trust me it’s worth it!) the reason I love this hairstyle so much is because often times the back underneath of my ponytail is the first place to get sweaty and fall down.
It’s annoying and not cute. Luckily, this hairstyle takes all those baby hairs that typically fall down and secure them tight! You won’t have to worry about that happening while you’re sweating! This hairstyle is also perfect if you’re not wanting to make too much of a hair statement at the gym but still have some pizzaz!
*Business in the front, the party in the back*
What You'll Need:
1 Clear Elastic Mini Hair Band
1 Regular Hair Elastic
Brush
Bobby Pins
Comb or something to part your hair
Hairspray
Instructions:
Split your hair into two halves horizontally (top & bottom) about even with the ears.
Flip your hair upside down and comb straight down.
Start at the nape of your neck and divide into three strands.
This braid should be similar to a dutch braid, so be sure to cross under the hair.
Braid upwards until you don’t have any hair left in the bottom half of the hair.
Once you have completed the braid, use the small clear elastic to secure the bottom of the braid.
Loosen the top half of hair.
Grab both the braid and the loose half of hair together to make a bun.
Carefully loosen each section of the braid by slightly pulling apart.
Complete the look with bobby pins to secure your top knot or fly-aways.
Once you have created your desired look, spray with hairspray to secure!
There you have it! Five gorgeous gym hairstyles that are functional for both a sweaty workout or a day in the office. Let me know which one you like best!
If you re-create any of the looks be sure to hashtag #MyGymHair and tag me on Instagram: @juliealedbetter– I'd love to see them!